For quite a long time, I’ve been struggling with finding any sort of pastime which wouldn’t be too similar to my main job. Sure, I love writing and contributing to various outlets, but I’d have to do something else to not go insane!
Photography might be the only activity that I liked for as long as I dug the journalism. I’ve never progressed much, though, and I wouldn’t say I am able to continuously produce good photos—although I can sometimes make still worthy of brand-name publications. What’s more interesting is I’ve never owned a camera, having to lend one from relatives and friends instead.
No, this isn’t going to be a GoFundMe announcement for a shiny new DSLR. Instead, I’m taking whatever I already have and, starting this week, trying to remember what kind of fun I was having with shooting and editing photos. To build both a skill and a healthy habit, I aim to consistently publish at least a few photos a week, complete with an analysis of my errors and a postmortem for each individual still. I will be making mistakes—that’s the whole point.
I am going to post my photos on Twitter, Instagram Google Maps (when relevant), and Flickr, complete with the Creative Commons Attribution tag on the former. Most importantly, I will be using this blog to vivisect my work and compare edited photos with the originals. (Please report me if there are some problems with fancy comparison galleries.)
Tools I’m using
Mobile photography has come a long way since whatever it was in the early 2000s. Most importantly, even mid-range photos can now do adequate stills. For the project, I will be using the new Samsung Galaxy A71 which comes with a whole bunch of sensors and lenses. Right now, I will let all the “AI” (read: re-branded auto modes) do the groundwork for me, but I do aspire to switch to the manual mode when needed.
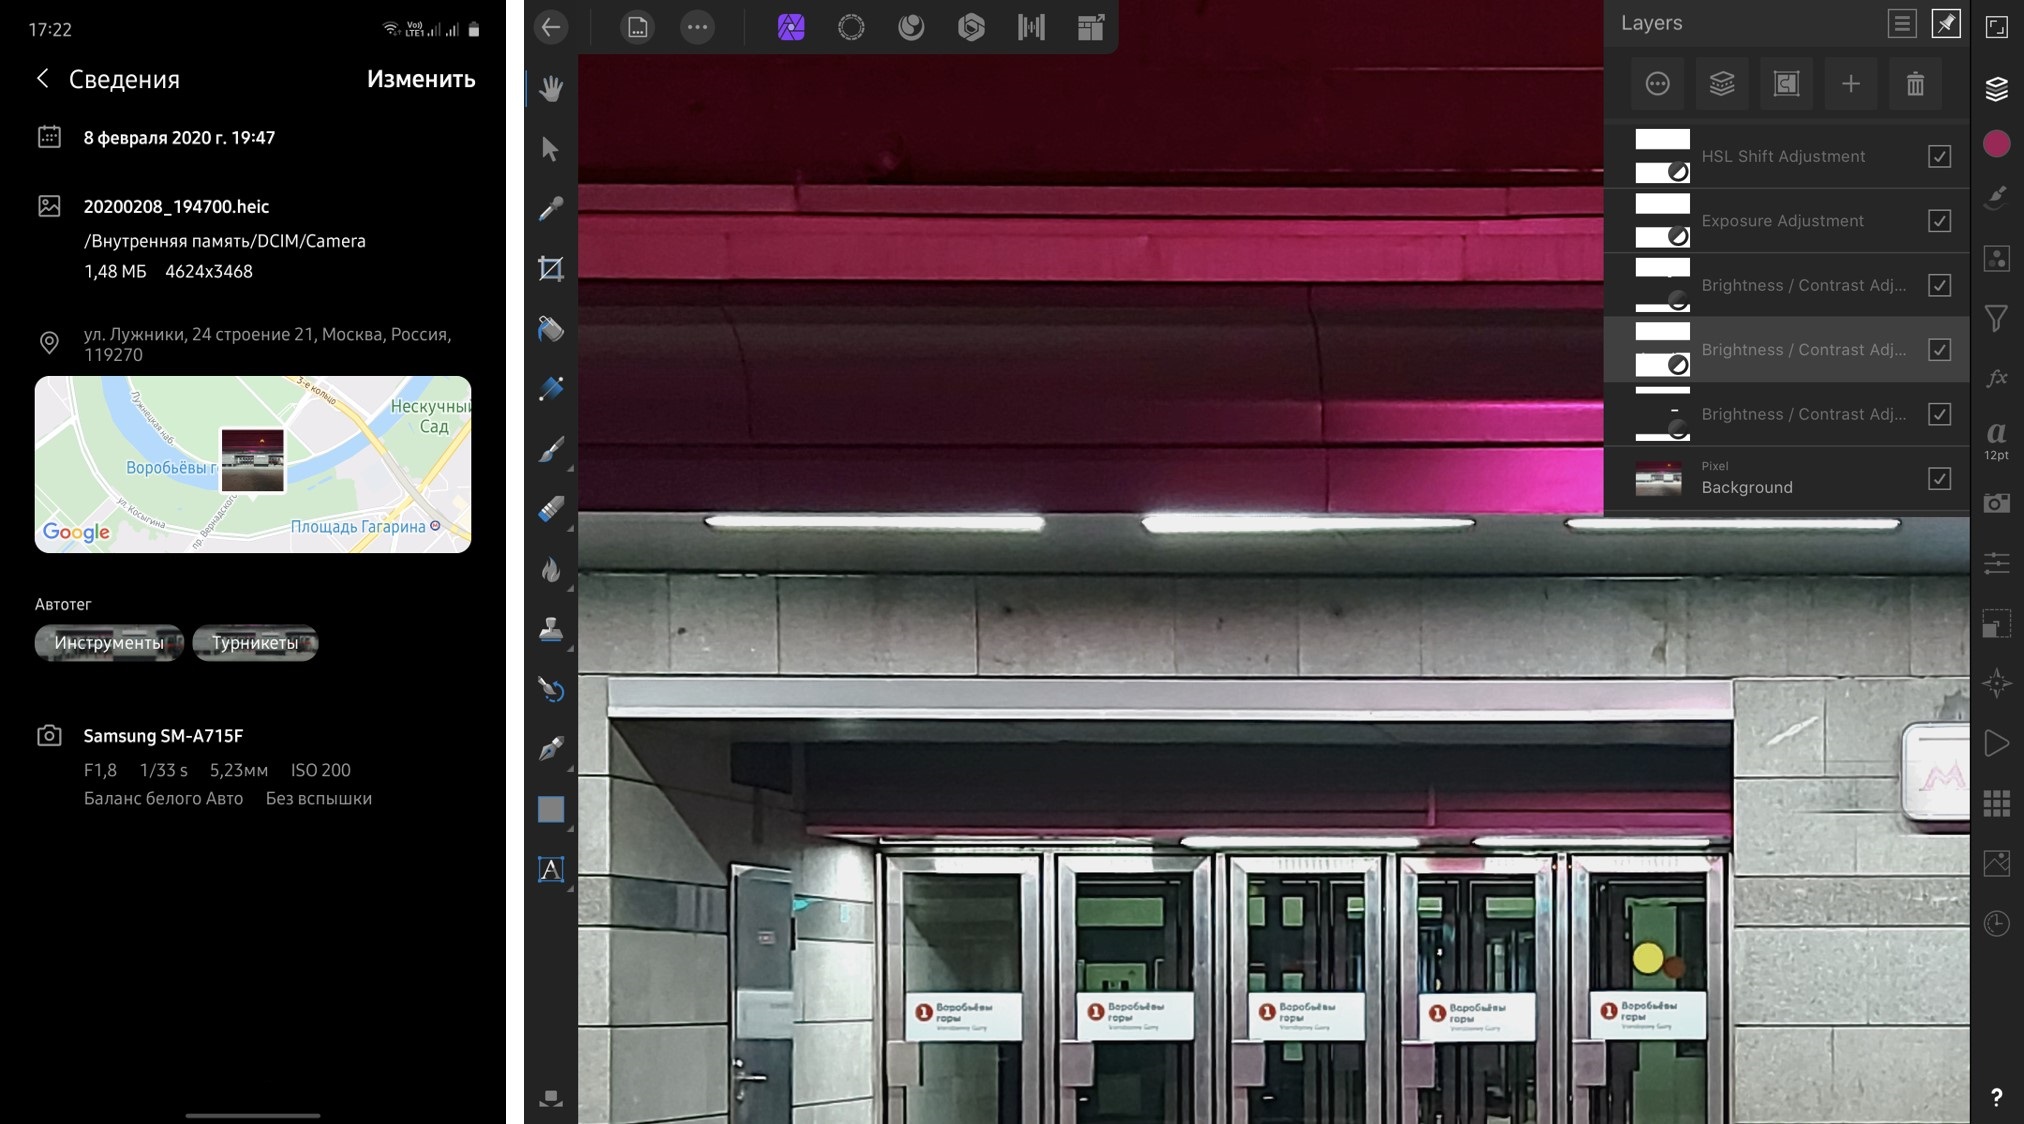
The post-processing will be done on the 5th-generation iPad Mini, suited with Affinity Photo and an Apple Pencil. I’ve edited enough photos using GIMP and a laggy mouse, so I’m going to treat myself to the comfort of the post-PC environment. Besides, while I’m only learning to use the Affinity Photo, I already appreciate its balance between a full-fledged editor and a collection of easy-to-apply filters (which, thank God, automatically go to their own layers and do not bake into the image unless you’ve ordered them to).
With that cleared up, let’s see what I was able to do this Saturday.
The Galaxy A71 does not have a telephoto lens or optical zoom, which is a shame. Samsung does try to make up for that by offering a macro sensor—the first in the industry, from what I get. It’s arguably the least useful camera in the four-piece set, but that did not prevent me from taking a few pictures with it. Shooting flowers would be the best case for it, but in February, bird feed in the park will do the job.
This is one photo that turned out fine composition-wise. Even if it was in need of cropping, I wouldn’t be able to do much with a 5-megapixel file. However, as I was trying to compensate for the early evening dusk, I’ve overblown the colors on the photo. Millet now looks like tiny oranges under a bad Instagram filter, and the sense of frost is gone completely. I will have to be way more careful with color correction.
That one was physically fun to do, as the shooting involved hiking through the field of snow and basically sticking the phone in it. As I was unable to look at the screen in detail, I relied on automatic guides to check whether the horizon is skewed. The phone did guide me—and made the building look like the Tower of Pisa.
Aside from rotating the photo, I’ve digitally removed some on sticks and objects from the snow. I could have done a better job, especially on the spot right below the metro station on the left. Colors are fine, compared to the first picture, although the harsh shadows on the building and smudges in the sky bother me a bit. All things considered, I think it’s an alright photo, if visually uninteresting.
This might be my most favorite photo of the bunch. Colorful lights right behind me reflected beautifully on an industrial-looking bridge-cum-station. I even managed to now screw them up! However, by relying on the rule of thirds too formally, I’ve left too little space to the pink area on the top. I should have realized that the second and third parts are too similar in color, with the asphalt floor being absent of anything visually interesting. Anyway, I find myself really attached to the result—maybe I’ll return to the original photo (or the spot) in the future.
In this photo, a similar composition worked better due to the better variety of colors. It’s also the one which I’ve spent the least time with in the Affinity Photo. I’ve mostly fixed the geometry and retouched parts which got smudged by the phone’s software (note the left border of the column’s base, as well as the train’s roof above the first door). The whole station is a delight, but I’ll return there only once I’ll become more skilled.
Here goes the first week of what I’ll try to do on a regular basis—if only for the sake of my sanity. If you spot some bad practices, feel free to guide me away from them! I would also appreciate it if you pinpoint something you’ve liked and note what exactly has grabbed your attention.
Photographers, artists, and writers use Creative Commons licenses to open their work to the worldwide community. But how would you do the same with your Microsoft Word document?
Technically, you don’t have to do anything special to release files made in Microsoft Office under Creative Commons license: just choose the variant you are comfortable with, print its name in the document itself and give a link to the license. A wizard on the Creative Commons web site can even generate the most preferable legalese.
But while this might be enough for humans, algorithms scraping the Internet for CC-licensed content need specially formatted descriptions. Machine-readable metadata is what search engines rely on when you limit the results to CC-licensed works only. On the Web, metadata are usually embedded in the HTML code using the RDFa format. Files generated by Adobe software, from images to PDF documents, use XMP profiles instead.
Back in 2006, Microsoft released an add-in for Word, Excel, and PowerPoint which allowed to mark documents with machine-readable Creative Commons license. Originally designed for Ofice XP/2003 and 2007, it was updated over time to provide support for versions up to 2013. However, if you have anything newer than that, the installer found on Microsoft’s web site will refuse to work.
Thankfully, the workaround does exist, and I’ve personally tested it with the latest, x64-based monthly build of Office 365. But, from my experience, here are just two mentions of it on the Internet, and both of them are not available in English. In this post, I’ll give a loose translation of a French blog post (which, in turn, is a translation from Chinese), as well as an overview of the tool.
How to install Creative Commons add-in for Microsoft Office 2016 and later
- Install Microsoft Visual Studio Tools for the Microsoft Office system (version 3.0 Runtime) (x86), Please note that you need to install the 32-bit version, no matter which platform your Windows or Office installation for.
- Update them with Service Pack 1.
- You’ll need the add-in files from the system it was already installed on. (Alternatively, you may use this archive; while I’ve tested it, you shouldn’t usually trust strangers offering you executables.) Copy the folder from the archive to C:\Program Files (x86) folder, or C:\Program Files for 32-bit Windows.
- Import keys from three registry files (for Word, Excel, and PowerPoint respectively) from this archive. You may need to edit them to omit the (x86) if you are running a 32-bit version of Windows.
Creative Commons add-in should now load on the next startup of Office apps it was made for.
How to license Microsoft Office files under Creative Commons
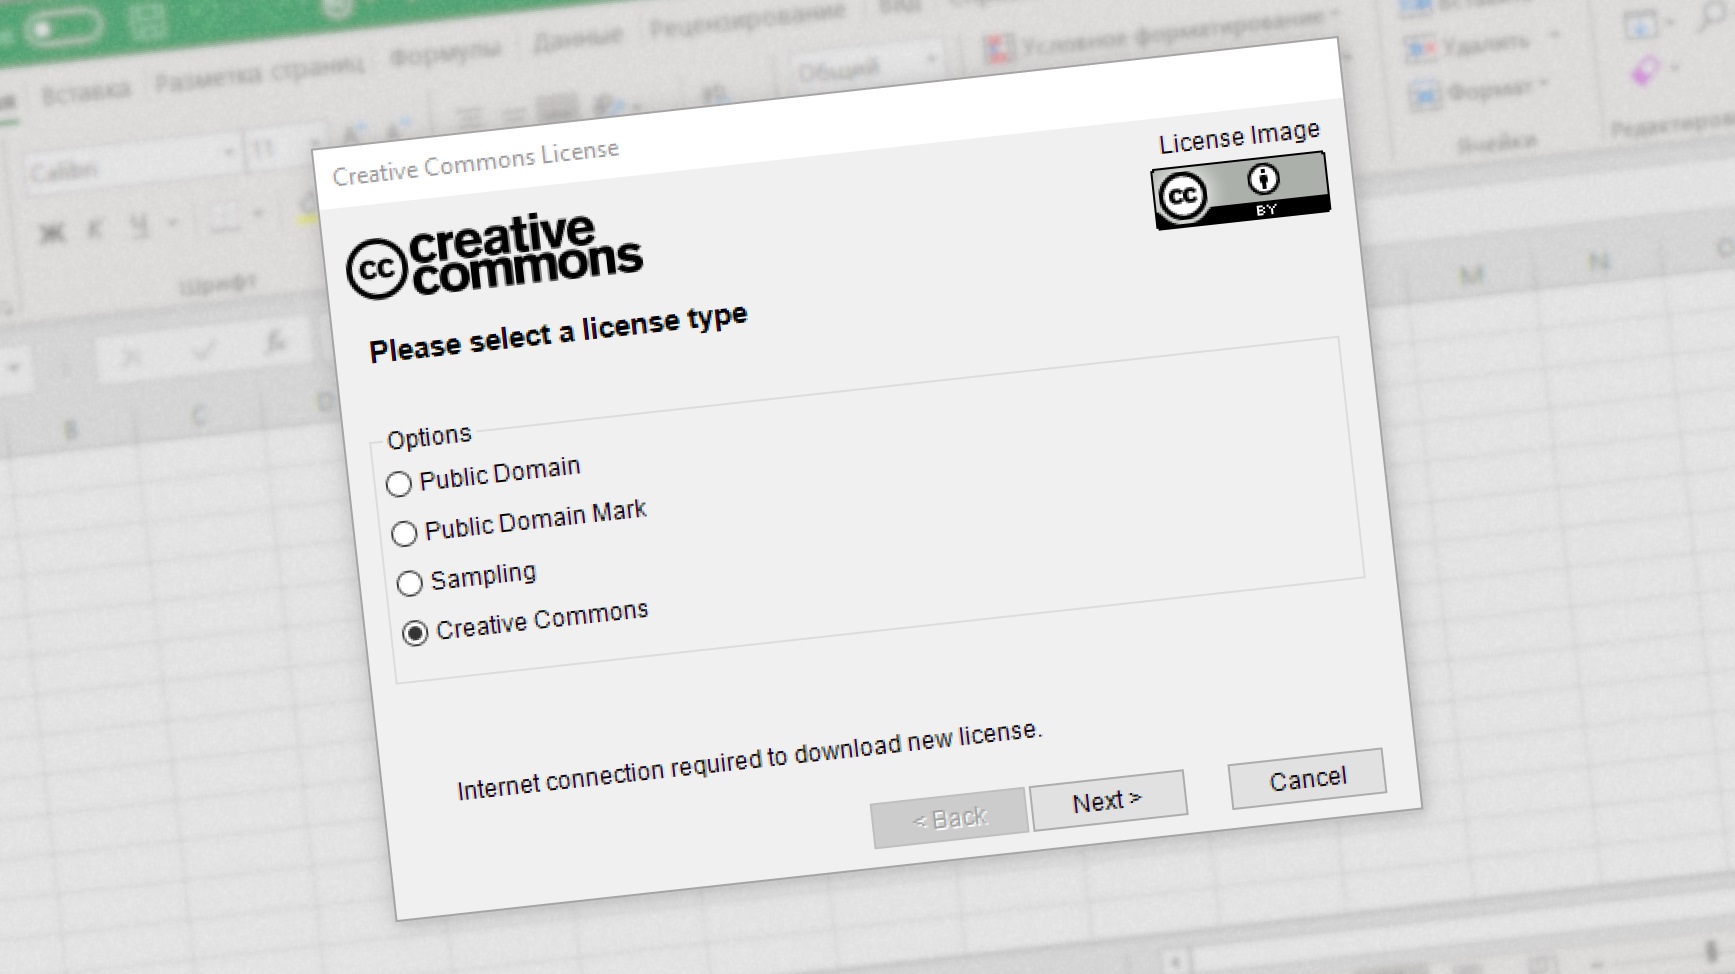
You’ll notice the To use a Creative Commons license, you need to download it first by selecting Licenses > New License… Unless you are dedicating the document to the public domain, the wizard asks you several questions: whether you are allowing commercial uses; what’s your modification policy; and what is the jurisdiction of the license you are going to apply. (Be sure to not select deprecated CC Sampling license.)
After the license is downloaded, you may apply it by clicking Licenses and selecting it from the dropdown list. The licensing works a bit different in Word compared to Excel and PowerPoint. With spreadsheets and presentations, the metadata are embedded in the document itself, and the visual data (Creative Commons button and the legal notice) can be changed or replaced. In Word, however, both visual and metadata are kept in a single locked field. While this provides greater security, it might result in a language disparity if the document itself is not in English. To remove the field, you have to use the Document Licensed button.
What it may be useful for?
Despite the tool being supported throughout the lifespan of five Office versions, the adoption of CC-licensed Microsoft Office documents is virtually nonexistent. Fiddling with search operators in Google revealed that, out of several dozen Word files with Creative Commons metadata, most of them were actually clippings of Wikipedia articles and other free web content.
Uploading Office files for public use when PDF files would suffice is an Internet mauvais ton. Still, using the add-in might be useful where interactivity matters — in feature-rich PowerPoint presentations and, most notably, complex Excel spreadsheets. And for me, it’s just nice to see one of the most prominent file formats in computing supporting Creative Commons on a technical level — even if few efforts were made in this regard since 2006.


